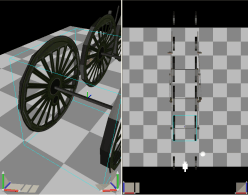
 | Train Simulator has very specific requirements for the orientation
and organization of models. This is especially true for engines and
rolling stock.
The first step with a model is to orient the model properly. A model
should be "facing away" as viewed from the default camera position of
3DCrafter.
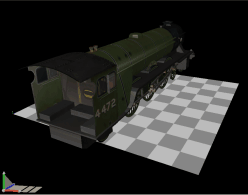
In this example we have imported the Scotsman model provided in the
Train Simulator's samples folder. Note that they have also provided
the textures for this model, but they are not correctly named. If you
want to import and use this model, rename the sscotsman01.bmp
texture to sscots1.bmp, the sscotsman02.bmp
texture to sscots2.bmp, the sscotsman03.tga texture to
sscots3.tga, and the sscotsman04.tga texture to
sscots4.tga before importing the model.
In this example the model is already oriented correctly. If your model
is pointing the wrong direction, rotate it so that it is pointing the
right direction. Make sure that you get this exactly right if you do
not, the wheels will not rotate correctly. Turn on SnapTo and watch
the orientation on the status bar. The Y orientation (the second entry
in the orientation) should be exactly 0, 90, 180 or -90.
If you had to reorient your model you will need to run the
NormalizeGroups plug-in on your model. This will reorient the groups
in a correct manner for Microsoft Train Simulator. This is critical
to ensure that your model is oriented correctly in Train Simulator. |
|
 |
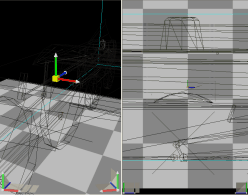
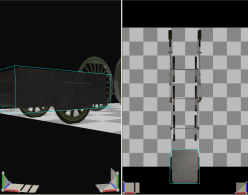
| Every train simulator model must have a "main"
shape. This is a shape located in the root group of the model.
Usually it is the part that best defines the shape of your model. This
import included a shape named "Main". In this example this shape
was moved to the root group of the model using the scene hierarchy.
The next step is to ensure that the main shape is positioned correctly
in its group.
In this example the main shape is centered in its group. This will
result in the model being embedded in the earth when loaded into Train
Simulator. |
|
|
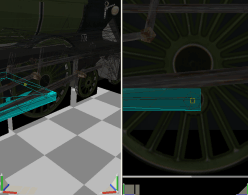
| To correct this, select the Shift tool and
ctrl-drag your model's "main" part until the group axis is located at
the base of the model.
If you are creating a structure or scenery shape there are no other
steps required. If you are creating an engine or rolling stock there
are some additional steps that follow. To export this model to Train
Simulator format see the
Train Simulator Model Exporting tutorial. |
|
 |
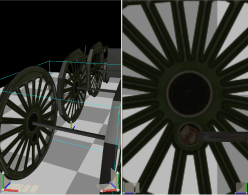
| If you are creating an engine or rolling stock it is necessary to
ensure that your wheels are centered in their group. Otherwise they
will not rotate properly. Select an axel and then click the Center
operation. This may result in the need to reposition the wheel if it
was not already centered. Note that in this sample we have made some
shapes invisible so that the wheel axels are easier to see. You can
do this by right-clicking on a shape and deselecting Visible.
You can make the invisible shapes visible again by clicking the
"Visible Shapes" button on the primary toolbar.
|
|
 |
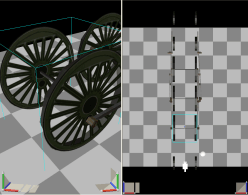
| The next step is to move all of the parts that define a wheel set
to the same group as the axle. In many cases wheels are created
separately from the axel. All parts must be contained in one group for
them to rotate in Train Simulator. |
|
|
| Using the hierarchy drag and drop the shapes for each wheel set
onto their axle's group. |
|
|
| All of the parts that make up a bogie must also be contained
in a
single group. Use the hierarchy to move all the shapes for each bogie
into a single group. |
|
|
| 3DCrafter will automatically animate the connector between drive
wheels on a steam engine. It is necessary though to ensure that its
axis point is
shifted to the right location. Using the Shift tool,
ctrl-drag the connector until its axis is located at the pivot point of the
forward drive wheel.
To export this model to Train Simulator format see the
Train Simulator Model
Exporting tutorial. |
|
 |