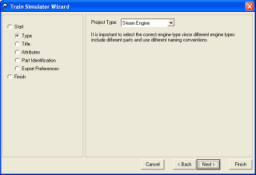
 | Select Use Plugin->TrainSimWizard from the Tools
menu. This will start the Train Simulator Wizard.
Click the Next button. Select the type of project you want. In
this tutorial we will continue with our work on the Scotsman model
imported in the Train
Simulator Model Preparation tutorial.
Select Steam Engine as the project type. Click the Next
button. |
|
 |
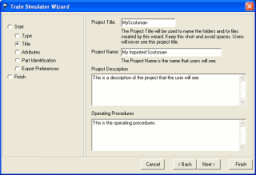
| Enter a project title of "MyScotsman". The project title is used
by Train Simulator to identify models. It should not contain any
spaces or special characters.
Enter a project name of "My Imported Scotsman". The project name is
the name of the model that users of Train Simulator will see.
Optionally you can enter a project description also. This is the
description of the model given to users. This only applies to engines.
Also, if you are creating an engine you can give operating
instructions.
Click the Next button.
|
|
|
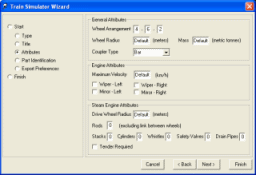
| There are many model attributes for engines and wagons. All of
them can be left at their default values with the exception of the
Wheel Arrangement.
The wheel arrangement for a Steam engine uses the common standard of
indicating the number of wheels in front of the drive wheels, the
number of drive wheels and the number of wheels following the drive
wheels. In the case of the Scotsman this is 4-6-2.
For other engines and rolling stock only two entry locations are
available. The first is for the number of wheels on the front bogie
and the second is for the number of wheels on the rear bogie.
Enter 4, 6 and 2 in to the Wheel Arrangement fields and click the
Next button.
|
|
|
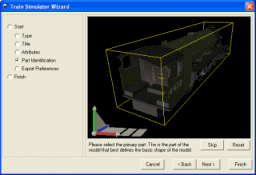
| The next step is to identify the parts of your model. Train
Simulator requires a very specific naming convention and organization
for models to work properly in Train Simulator.
The first part to be identified is the "Main" part. This is the part
of the model that best defines the basic shape of the model. |
|
|
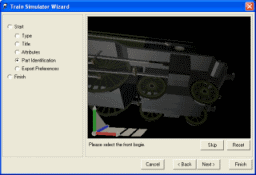
| The next part to identify is the front bogie. You may find that
you have to navigate to find some parts.
Continue identifying parts until 3DCrafter indicates there are no more
parts to identify.
Click the Next button. |
|
|
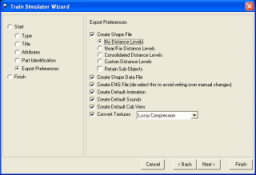
| There are a number of options available for exporting. If you are
not familiar with the details of the files produced, do not de-select
any options.
Click the Next button and then the Finish button. |
|
|
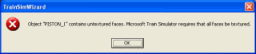
| If any of your shapes are untextured Train Simulator will not be
able to use them. In the case of the imported Scotsman model, the
"PISTON_1" part was untextured. It will need to be textured before
this model can be used in Train Simulator. The easiest way to do this
is to select one of the textures used by this model (for example the
SSCOTS.BMP from the Train Simulator Samples folder), select the
"PISTON_1" shape in the shape hierarchy and use the FillUntextured
plug-in to paint all untextured faces. This may not be the most attractive
way to texture, but sometimes there are hidden faces that are untextured and difficult to texture.
Using the FillUntextured plug-in is the easiest way to correct this.
Another alternative is to select a bright color rather than a texture
so that the untextured faces are easy to find and texture.
Once you have textured all untextured faces, re-run the TrainSimWizard. When it starts,
click the Finish button. You have already completed all of the
necessary steps previously and the wizard remembers all of your settings for
this model. |
|
 |
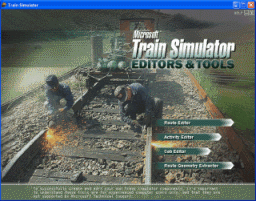
| To use this engine in Train Simulator requires creating a consist
for it. A consist is a grouping engines and/or cars.
Start the Microsoft Train
Simulator Editors & Tools and click the Activity Editor button. |
|
 |
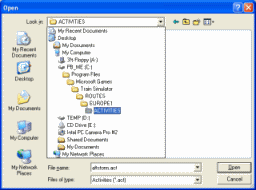
| The tool used for creating consists is buried in a fairly obscure
location. Click Open on the Tools menu. Select
aftstorm.act from the ROUTES\EUROPE1\ACTIVITIES folder. We will not be
making changes to this activity but we have to open an activity to
display the Consist Editor. |
|
|
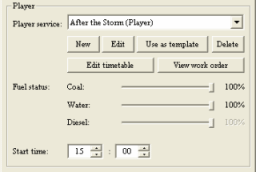
| On the right side there a section called Player. Click New.
Again, we will not be creating a new player, but in order to display
the Consist Editor we must select this. |
|
 |
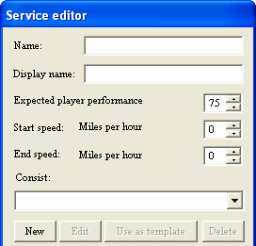
| A new window will open. Click New under the Consist
drop down box. This will display the Consist editor. |
|
 |
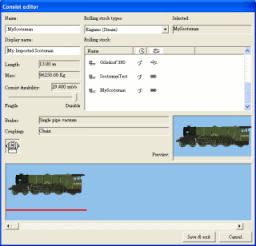
| Enter "MyScotsman" as the Name for your consist. Enter "My
Imported Scotsman" as the Display Name for your consist.
Select "Engines (Steam)" from the Rolling stock types drop down
list.
"MyScotsman" will be available in the Rolling stock list. Click it and
drag it onto the blue panel at the bottom of the window.
Click the Save & Exit button.
Click the Cancel button. Then select Exit Editor from
the File menu. Answer "No" to saving changes. We do not need to
save the changes to the activity. The consist has already been created
and we don't want to affect the aftstorm activity.
|
|
 |
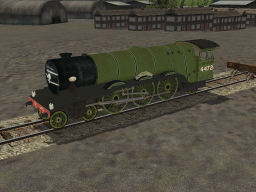
| If you run Train Simulator you will see that "My Imported
Scotsman" will now be available as a locomotive.
Notice that a few things are missing: The windows are transparent, not
translucent, there are
no smoke or steam effects and only the main link between the drive
wheels is animated. All of these issues are easy to resolve.
The next step is to correct the transparent windows which we will do in the Train
Simulator Materials tutorial. |
|
 |